Step 1 — Logging into your File Manager
Login to the cPanel of your hosting account. Find and open the File Manager tool.

Step 2 — Understanding e-mail directories
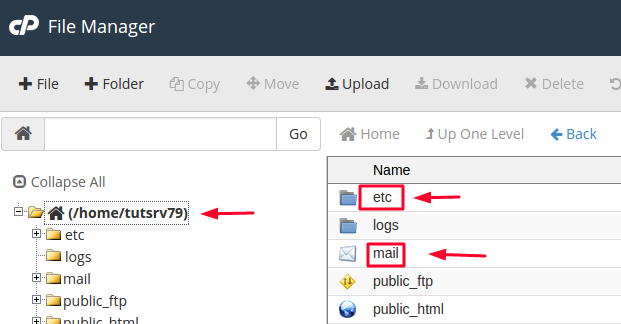
Once inside the File Manager, ensure that you are in the home directory of your hosting account (it is usually in /home/username/ format). You will see two directories, etc and mail.

- The etc directory contains information about your e-mail account names, passwords, quota, and other metadata.
- The mail directory contains your actual e-mail messages and content.
Step 3 — Compressing your e-mail directories
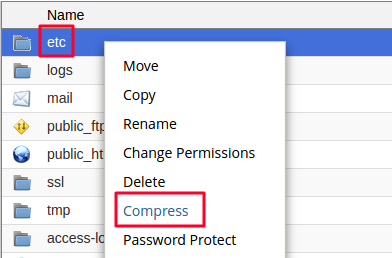
Right click the etc directory and select Compress.

In the next window, you will see four archive types that you can use:
- .zip archives offer standard compression and are usually used by Windows users
- .tar archives offer no compression and simply put all of your files into an archive.
- .tar.gz archives are compressed with the
gzipalgorithm. These archives are usually used by Linux users and offer decent compression ratios. - .tar.bz2 archives use the
Bzip2algorithm, which offers better compression than .tar.gz, however, the algorithm is slower.
Select Zip Archive as the compression type for maximum compatibility. Leave the name unchanged for easy restoration in the future. Click Compress File(s) to compress the archive.

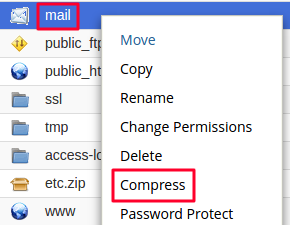
Perform the same steps for the mail directory as well.


Step 5 — Downloading the compressed archives
In order for your backup to be safe, you must download it to your local machine. A backup archive stored on the hosting account itself is not secure or reliable.
Right click the etc.zip archive and select Download. Do the same thing for the mail.zip archive. Your archives will then be downloaded to your machine.


Your e-mail accounts and messages are now downloaded and safely backed up on your local computer inside these archives.